Gear Review: Umpqua ZS2 Overlook Chest Pack
This is a combination post, offering a gear review and some of the modifications and configurations I’ve adopted after using the Umpqua ZS2 Overlook pack for almost two seasons.
I’ve gone back and forth between chest packs and minimalist approaches to carrying my gear. I like the concept of a chest pack; fly boxes and tools are easily accessible and carried high enough to allow for deep wading. However I can’t wear some of them without experiencing significant pain in my upper back or trapezius area. The pain comes after a short period of wear, and weight isn’t the issue because even an empty pack will cause the problem.
For this reason, I adopted a minimalist approach, using a simple neck lanyard while storing everything else in my waders. It worked ok, but a few things weren’t quire right: I had to remove the fly boxes from my waders after every trip, and I could never really get used to having tools dangling from the lanyard. We fly fishers are an opinionated bunch and certainly have our hang-ups.
A career in the military trained me to obsess over my kit and that bled over into my fly-fishing hobby. As it turns out, there are a lot of similar principles. These are the basic requirements that dictate how I set up my equipment:
- Gear must fit well (snug) without any loose straps or items to get hung up or snagged.
- It needs to remain in position while you move and needs to facilitate movement.
- Access to essential tools without fumbling or having to look at what you’re doing.
- Must be worn comfortably for extended periods of time.
- No loose straps or anything that could get caught or hung up on an obstacle.
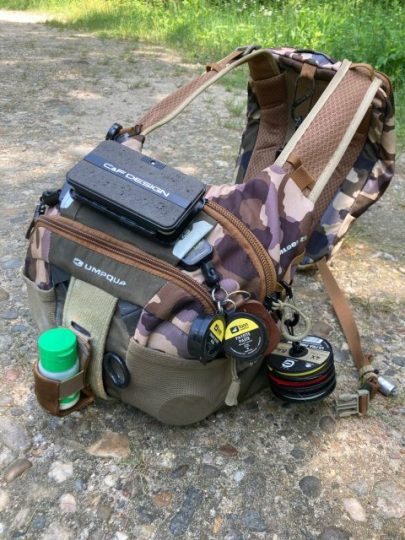
In the spring of 2020, I decided to give the new Umpqua ZS2 Overlook chest pack a shot after a friend began using the smaller Rock Creek version. I wanted the backpack to provide balance and hopefully relieve stress on my shoulders. After going through my typical ritual of sizing, adjusting, and modifying the pack I was pleased to find that the backpack eliminated the usual pains associated with other chest packs and it remains comfortable after 18 months of use.
Here are the features of the ZS2 series that I find most appealing:
- ZS stands for “zero sweep” and refers to the integrated tool mounting features that allow you to attach retractors to the inside of the pack which can be extended through the outside through ports sewn into the pack. Attached tools are drawn into ports and sit securely when not in use, as opposed to dangling freely.
- The packs can accept “MOLLE” type attachments. This simple modular concept is borrowed from military equipment in use today.
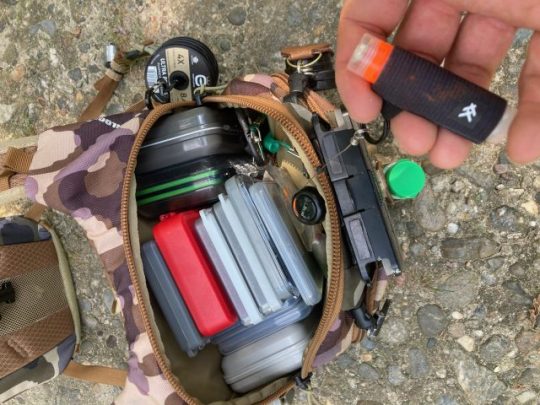
- Aside from alleviating my pain problems, I appreciate the storage space of the backpack. I use it to carry things like a small, 1 quart hydration system, a rain shell if needed, and a spare reel and spool along with infrequently used items. I don’t always carry all of this, but I have the option. Access to the backpack is easy; unclip the side straps and rotate the chest pack to the rear – there’s no need to remove the pack.
Here are the features that I don’t like:
- The net holster on the back of the pack is a gimmick, in my opinion. I tried it with a long handled fishpond net and found the positioning of the net (rides high) made it difficult to deploy and even more difficult to stow – the two basic requirements of an efficient net configuration.
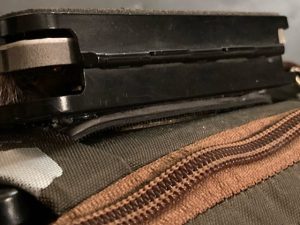
- The backpack has two zippers (one on each side) that come together to close the main compartment. They can separate and work themselves open enough to potentially allow something to fall out. I alleviated this problem with a tiny carabiner that clips the two zippers together. Because I’m not regularly accessing the backpack, this is a workable solution.
- The forceps attachment on the front holds the forceps in position securely and mitigates line tangling. However, it’s difficult to get them back into position with one hand and I find it easier for me to access a pair of forceps from the inside of the pack instead.
I made a few modifications to tailor the pack to my specific needs:
- It comes with a foam fly patch mounted on the top, attached with Velcro and has two “wings” on either side that tuck into “zero sweep” slots sewn into the pack. The fly patch is secured by the Velcro and the tucked wings eliminate the possibility of the patch getting ripped off of the Velcro pad. I removed most of the foam from the patch with a razor blade and epoxied it to the back of my C&F working box which is now very securely attached to the top of the pack, right where I want it. It has three attachment points: the Velcro, the wings tucked into the slots, and the pin that comes on the back of the C&F box.
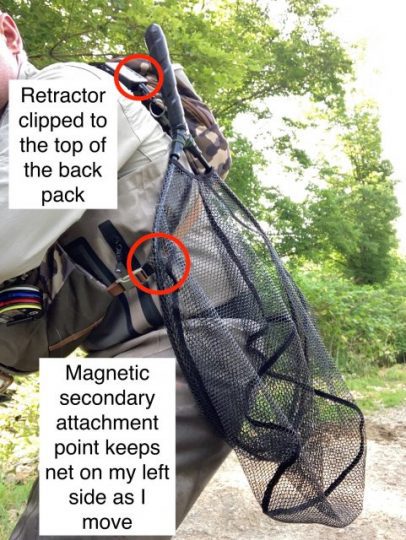
- I carry my customized Frabill on a heavy duty retractor clipped to the top of the backpack. I use a magnet to provide a second attachment point on the left strap of the pack; this keeps the net hanging along my left side instead of swinging around as it would with only one point of contact. It takes one hand to deploy the net and no hands to stow it.
- Once I have the straps adjusted for fit, I wrap the excess material in place with tape to keep them from coming loose. When putting the chest pack on, sometimes the straps get crossed. I taped the right side with red tape so that I can easily ensure I’m buckling the correct strap, as straps sometimes have a tendency to get crossed in the process of putting on the pack.
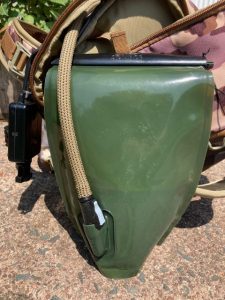
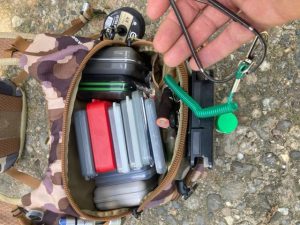
- Umpqua makes a floatant holder that attaches to the MOLLE system. It’s too big for smaller containers like Frogs Fanny, but a zip tie maintains the right amount of pressure to keep it in place. I don’t like having to keep digging inside the pack to get at my floatant and if you’ve ever spilled a bottle of Frog’s Fanny in your pack you know what a mess it makes.
- The tools I use most frequently (nippers, amadou patch, and line dressing) are clipped to retractors. I keep an IR thermometer on a retractor on the exterior.
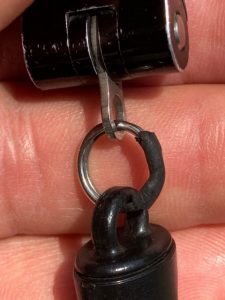
- I avoid split rings because leader and tippet have a nasty habit of finding their way inside the rings. Where I do use them, I seal up the joint with tape or epoxy. If that sounds a bit over-the-top to you, you might change your mind after attempting to land a big fish and suddenly find your leader hung in a split ring.
- I frequently use Skafars neon wax on my tippet or leader. It comes in a chapstick-style tube. I struggled with managing the tube, the cap, and everything else while applying the wax out in the middle of the river. A key-ring chapstick holder and a magnet glued to the inside of the cap helps me apply wax efficiently.
- While not a modification per se, I will note that I found a certain orientation of fly boxes works best for me. While testing for fit and functionality, I moved boxes around until I found a system that worked reliably; no more digging for boxes. Instead, they line up neatly and stay that way.
So many of the innovations in tackle, equipment, and methods have evolved out of competitive angling circuits. Many of them help make pleasure fishing more efficient and enjoyable. For a great example of a well explained, well thought-out approach to chest pack configuration, check out this video by Howard Croston, 2019 World Fly Fishing Champion. I believe that time and thought dedicated to arranging gear can make angling more efficient and enjoyable.
Admittedly, I’m a bit of a gearhead and there’s no shortage of products marketed to people like me, but the Umpqua ZS2 Overlook chest pack has proven to be one of my most enjoyable purchases. I’m curious to know what system others use, so please feel free to leave a comment and share what works for you.
Always love to see how folks adapt their gear. Great post and given me some ideas!
I’m ready to say goodbye to my slingpack. I was hoping it would ride higher than my previous waistpack, but it regularly gets wet, even wading though just waist deep water. After a day of fishing my shoulders are all cramped up. No wonder I don’t catch more fish! 🙂 I’ve been toying with the idea of using a chestpack and your article answered a lot of questions for me. We need to go fishing together some time so I get a better look at your jazzed up ZS2. Great article – thanks for sharing your expertise.
I love it with the backpack and bottle holder added on. I use the tippet holder on the front as well.
Great review! I recently purchased the Overlook and have used it for 3 or 4 outings. I switched from a Simms Guide Vest looking for something that would be more comfortable in warmer weather, provide easier access to both the front and back pockets, and provide better support by not resting on my neck. The Simms vest is a great vest but for late spring through early fall it was just too warm for me.
I think I am mounting my net retractor similar to how you have done it by using the very top loop on the backpack. Otherwise, if you use the D ring under the holster the net drops too low.
My assessment of the Overlook is consistent with yours. I have sent Umpqua the following feedback to consider:
– Offer a backpack without the net holder. Honestly I find that they just don’t work for short handle nets and only interfere with a traditional magnet or retractor mounted net.
Include two eyelets to mount the C&F chest boxes so as not to create wear problems adding and removing the box.
Offer a larger backpack to be able to store extra clothing, food, etc. for longer more remote days on the water. Although you can easily wear a separate backpack and use the smaller backpack with the Overlook. Fishpond does this for some of their packs which is a nice feature.