Lengthen and boil your Euronymphing sighter. Really.
I’ve been test driving my new-and-thin Euronymphing leader (scroll down for the formula and links to the materials). And, I love it. It is a journey of “less sag, less drag.”
I have been putting the new rig through its paces: short-lining, long-lining, floating the sighter at shallow water, streamer fishing and throwing Euro dry-droppers.
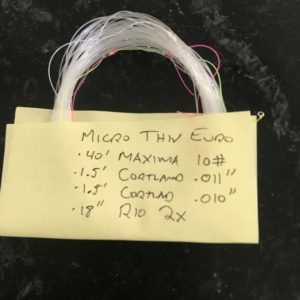
I have various new leaders neatly wound and kept together via a folded and labeled Post-it Note. I store them in my Rio Leader Wallet (which, after just over four years of fly fishing, continues to be in my pack as other gadgets get removed).
Compared to my regular Euro leader, I’m sacrificing a little bit of dry-fly distance with the thin leader. But, that is a small price to pay for some huge benefits:
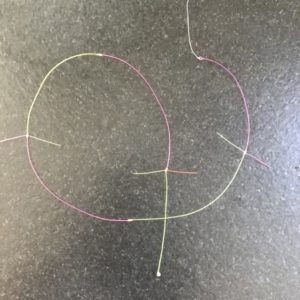
- Ridiculous sensitivity. The sighter is comprised of two sections of indicator mono, which is extremely sensitive. They constitute a 4.5′ piece of mono that trembles during drifts. When the trembling stops, it is either a fish or an obstruction. Here is part of an email exchange with two-time national champion George Daniel:
“The idea of the longer sighter is not when the rig is under high tension (i.e., when you feel the strike) but, rather, when you’re drifting light-to-medium weight rigs, where the angler sees the strike rather than feels the strike due to the current drifting the nymphs back. This drift is like that of a dead-drift, dry-fly presentation, where the angler needs to stay in front of the presentation to maintain connection *but* without dragging the flies.
“When this natural drift occurs, I watch the bow in my sighter tighten to determine when to strike. The longer sighter section allows for a bigger bow to form and that makes it easier for me to see when tension (i.e., in form of a strike) sets into the drift. It provides a quicker feedback loop.”
- Visibility from opacity. My previous sighter was made of colored mono called Amnesia. But, it wasn’t indicator mono. I didn’t think it mattered, but it does. Here is UpCountry’s Torrey Collins with the explanation:
“I think you will find actual sighter material is much easier to see than using Amnesia for your sighter. Amnesia is translucent, while sighter materials are opaque. I believe they first dye them white, and then they dye over that with fluorescent colors. Really makes them pop.”
- Visibility from multiple colors. I purchased two indicator mono materials: white and a combo of bright red and green. The latter two are very visible when the sun is out. White shows well during low-light conditions. So, all together, I have no problem seeing my sighter during both low-light and high-glare conditions.
- Great for smaller flies. When fish are feeding and looking up, it is a good idea to throw emergers. My thin leader really shines with small flies. To fish them, I grease the sighter and partially lay it on the water to create the bow-shaped curve George mentioned. A thin leader, with limp sighter material, definitely produces less “drag from sag.” Again, Torrey:
“The Rio and Orvis sighter materials are both very limp, so when you’re fishing lighter flies, and you have a little bow in your sighter, it’s easier to see the bow straighten out when you get a soft take.”
Lastly, I boiled my sighters. At George’s clinic (and, in his awesome new nymphing book), he recommended that we boil a sighter for six minutes to make it extra soft.
He’s right. It has made a huge difference. I feel that I can feel every bump and pause during my drifts.
My prior Euronymphing leader worked extremely well. But, it is fun to tinker and try something new. And, I’m hoping to catch bigger fish.
When water flows lower, I will test-drive the micro-thin leader. The journey continues.
Running line and leader butt
Sighter, part 1
Sighter, part 2
(five-turn blood knot every six inches, leave on 3/4" tags to create "bunny ears," and boil for five minutes to soften)
regular
thin
micro-thin
(.012")
(.009")
Discover more from BlogFlyFish.com
Subscribe to get the latest posts sent to your email.
Just curious about the fly weights you would use/ not use with this micro sighter. From your article (excellent BTW) I surmise George is talking about lightly weighted flies with that indicator on the surface vs flies with lets say 3.0+ tungsten for which a traditional leader is used. Am I on the right track?
Yes. Depending on current speed and depth, and where fish are in the water column, I will throw nymphs with small tungsten beads or ones made from brass or glass. If the fish are suspended and taking emergers, unweighted flies can work, too.
And if they’re moving to dries, a Euro dry-dropper is a fun way to fish.
The Euro set-up is extremely versatile and catches fish like crazy.
Hope you’re well.
Hi Steve. I also fish this way. When floating the sighter, you won’t suspend much weight and I would say if you’re fishing a 3mm tungsten bead and your sighter is floating, you’re probably not in contact and its slack that’s allowing the sighter to float.
This lighter approach will allow you to use smaller, 2-2.5 mm or even brass beads and get a more natural drift than a heavily weighted fly. However when you do need to size up and go heavy, the improved sighter works just as well.
Usually the sighter isn’t floating when I am fishing heavy nymphs but more like a Czech nymph approach. My question is more that is this leader setup useful when fishing heavy nymphs as well as very light ones? AND how does the leader work with the Contact rods? Do you incorporate tippet rings? I use a very short section of heavy Maxima with a tippet ring off my Cortland Sylk line then tie the leader to that ring. That way I can change to a Tapered leader for drys if needed. Of course you need to carry an empty tippet spool for winding up the EuroLeader.
It works well with heavy nymphs, too.
Yes, it works with the Contact rod.
I incorporate tippet rings, usually at the end of the sighter.
For true Czech nymphing, fishing under your rod tip, for example, this type of rig will work fine, but it really shines at longer ranges and will help you get down and in contact with you nymphs much more quickly. The result is a longer, more fishable drift.
Excellent article as always! Curious on the need for the Orvis indicator in the thin setup. Is there are specific reason to using this and Rio (aside from the different diameters)? I use Rio now, but noticed the Orvis stuff is tri-colored with white. Is it because of a different color? Why not just step down using just the Rio in 0.11 and 0.09 from the white Cortland mono? Probably just what you had on-hand, but was curious if there was anything specific behind it.
Thank you for your analysis. Love the perspective on Euro on NE trout streams.
Thank you!
Yes, I do it for diameter reasons and to create a tapered leader for easier dry-fly casting.
I love your post-it trick! I use the RIO leader wallet, too. And although I don’t do a lot of euronymphing, I’ve adopted your trick for my mono and furled leaders. It’s very space-efficient! My own innovation is to use Post-It “Extreme” Notes, which are stickier, water-resistant, and generally tougher. And I color-code for streamer leaders, light-weight leaders (0-3wt), and so one. Always enjoy reading the blog!
Cheers,
David
Great idea to color-code!
Great post. Thank you.
Two questions, if you don’t mind:
If you were not going to leave the option of fishing dries open, how would you configure your leader?
How do you rig your tippet section for Euro nymphing?
Alex
Trying a thin euro leader for the first time later this week on a larger tailwater the Yuba in northern California. I tried boiling the entire leader including the sighter as one article I had read suggested in order to create stretch in such ultra-light euro-leaders. While the main leader of florescent yellow 8# Maxima HV didn’t seem to change at all from the 6 minutes of boiling, the sighter itself now stretches like a rubber band, offering what I’m assuming will be enough shock resistance to allow me to fish 6x instead of 5x with the same flies. Looking forward to checking out this new lighter leader. Thanks for the post.
Let me know how it goes. Good luck!
Hi there, hope everything is OK during the pandemic! Fishing has been a good escape! I’m writing because this is the only page (I’ve searched many!) where I’ve seen it shown that .015 chameleon (15lb) is connected to .012 cortland indicator mono. I’ve just spent several hours trying to do exactly this with a blood knot. I’ve stopped at various steps and examined it with a magnifier. What’s happening is that the thicker, stiffer chameleon refuses to wrap around the suppler, thinner indicator material when I cinch the knot. Instead the indicator ends up wrapping around the chameleon on the side where it’s supposed to be the other way around. It cinches up sloppy and breaks easily. Sorry for the details, but I’m stuck! Do you use a blood knot for this connection? And if so, what’s the trick to get the stiffer chameleon to wrap correctly? I’m able to tie blood knots perfectly well on closer diameter materials, and don’t have access to any in-between diameter material at the moment. Thank you.
Sorry for the complications!
Yes, a blood knot. Wet the knot and slowly pull it until the wraps align. Then, pull quickly to finally tighten everything. You always could buy a large tippet ring, instead?
Thanks, I’ll keep trying then.
I don’t see where I can upload pictures here, but I took a couple that show the issue. I can understand the need for transition material, if not for casting then at least for avoiding the difficulty of blood-knotting different diameters.
You can put them up on Google Drive and post the link?
OK, good idea.
Picture A shows how the indicator wraps around the maxima on both sides of the knot. The tweezer’s there just to facilitate taking the photo:
https://drive.google.com/file/d/1i4QNvOCxWkXnnTR_BcV2Bn8GogKZ5L4o/view?usp=sharing
Picture B shows the final knot, the best I could get it out of 20 or so attempts:
https://drive.google.com/file/d/1ODxalNHLDnLS-U7ugYsEtSdEt3lqetBC/view?usp=sharing
Got it. There are multiple versions of a blood knot. This is the one I use, which should solve your problem.
Let me know if the blood knot I had sent to you helps?
I tried, I couldn’t do it! The chameleon just swallows up the smaller stuff. Some of the knots seemed strong enough, but the chameleon turns weren’t settled right. I have some in-between diameter material on the way for a transition, so that should hopefully take care of the problem. Thanks for the link, I think I’ll use that way for doing the blood knot from now on.
Do you find your micro-thin sighter is adequate for “floating the sighter”? I know Devin Olsen has a video where he advocates for a .012 diameter sighted for that technique.
No issues